University Classroom spaces utilize a variety of different equipment to help make a better learning environment. Many of the classrooms have microphones to capture the audio in the room for lecture capture and to enhance audio for easier hearing in large rooms.
Rooms with more than 70 seats most commonly are the ones to receive wireless microphone installs. To see more information about a particular room and what is available check out the Classrooms website.
Learning Spaces Team installs a similar type of microphone in each room. Below is a general overview of each type of microphone.
Wireless Body Pack
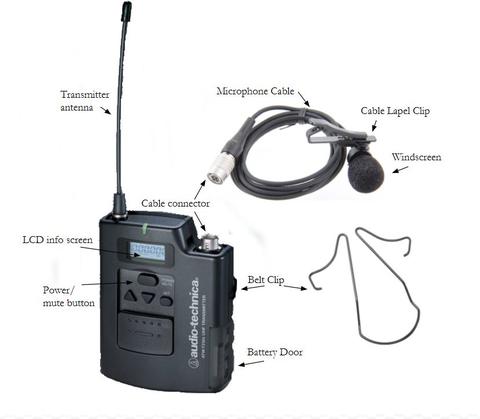
Pictured is the different parts of the body pack microphones.

The following is a description of each part:
- Transmitter antenna- This antenna transmits audio back to the in room receiver.
- LCD info screen- Displayed on this screen is the specific frequency assigned to the room. It also shows the battery status and if the microphone is muted.
- Power/ mute button- Holding down this button for 3 seconds will turn the unit on/off. Pressing the button for 1 second will mute the microphone.
- Microphone Cable- This cable connects the microphone element to the transmitter pack.
- Cable connector- Connection point between the microphone cable and the transmitter pack.
- Belt clip- This clip goes on the back of the pack. It clips the transmitter pack onto a belt or waist.
- Battery Door- This door covers "2" AA batteries that power the pack.
- How to change batteries: Slide the door lock down to unlock the batter door. Push the two arrows together to open the door.
- Cable Lapel Clip- The lapel clip is to hold the microphone element up near the audio source.
- Windscreen- This is a foam cover for the microphone element to help with excess noise due to air movement.
Wireless Handheld Microphone
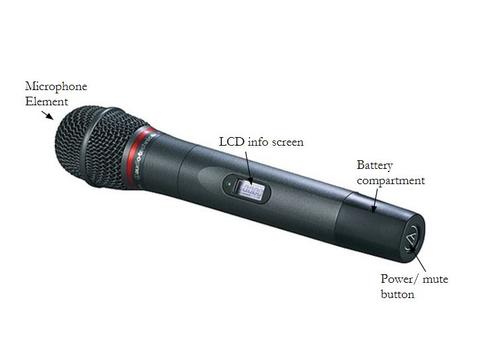
Pictured is the different parts of the handheld microphone.
 The following is a description of each part:
- Microphone Element- This part of the microphone that receives auto signals to be transmitted
- LCD info screen- Displayed on this screen is the specific frequency assigned to the room. It also shows the battery status and if the microphone is muted.
- Battery compartment- The bottom portion of the microphone unscrews to get to the battery compartment. The microphone is powered "2" AA batteries.
- How to change batteries: Gripping the microphone element in one hand, grasp and twist the battery compartment counterclockwise while slightly pulling down with the other.
- Power/ mute button- Holding down this button for 3 seconds will turn the unit on/off. Pressing the button for 1 second will mute the microphone.
Battery Information
Learning Spaces supplies batteries for University Classroom microphones. There will be a supply of AA batteries in the locked microphone drawer with the microphones. An average battery life span for "2" AA in a microphone is about 8-10 hours. The LCD info screen will show the status of the currently installed batteries. When a room's supply of batteries runs low please let the support staff know at classroom-technology@uiowa.edu or 319-335-1976 (5-1976).